We suggest that you read the following instructions through. When you know all the parts of the splicer and how each works, come back to Point #1 and start your first splice.
The splicing method to be used is called "splicing to the nearest
frame". This means that the last whole frame on either end of the films
being spliced will be the first (or last) frame to show after the
overhanging ends are cut off and the splice is made. 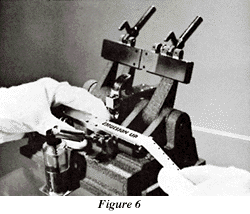
This splicing method depends on a very important editing principle and that is, ALWAYS CUT YOUR PICTURE IN THE MIDDLE OF THE FRAME. Never ct on the sprocket hole line or diagnolly across the frame. Cutting in mid-frame prevents unnecessary frame loss and leaves no doubt as to which frame is to be spliced.
Now for the splicing procedure, point by point:
- With both upper blades raised to their highest positions, place the
film in the right lower blade and register the next to the last sprocket
hole on the back pilot pin (Fig. 6).
Remember that we will be using the back pins in all our work. Both right and left pieces of film must be registered on the back pins to maintain proper alignment.
The film goes into the splicer EMULSION side up and, if single perforated, the sprocket holes go AWAY from you. Note the lower blade positions in figure (6). There is a line here where right and left blades butt together. This will be the splice line and your reference point for registering the proper sprocket hole onto the pilot pins. Always allow one half frame only to extend beyond the splice line. Register next to the last sprocket hole on the pilot pin with your left
hand. (Fig. 6). Use the tip of your gloved left index finger to secure
ilm on the pin. Make sure that you touch the film only at the upper edge
between the sprocket holes and outside the picture area.
Register next to the last sprocket hole on the pilot pin with your left
hand. (Fig. 6). Use the tip of your gloved left index finger to secure
ilm on the pin. Make sure that you touch the film only at the upper edge
between the sprocket holes and outside the picture area.
As your left finger fits the sprocket hole on to the pilot pin, your right hand holds the other end of the film taut and flush against the guide at the right end of the blade. This step is essential for proper alignment of the splice.
During splicing, the half frame extending beyond the end of the blade will be cut off by the edge of the left blade.
With your right hand holding the film flush against the guide, use your left hand to pull the right upper blade down to stop position. Lock the clamp and the vertical lever. With the film locked between, raise both right blades to upper stop position (Fig. 7). - Now for the left side. (Fig. 8). Cut the film in mid-frame and place
it on the left back pilot pin with the EMULSION UP. Use the tip of your
gloved right index finger to fit the next to the last sprocket hole over
the pin. Be sure that you touch the film surface only in the space
between the sprocket holes and outside the picture area.
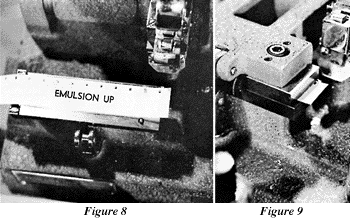 When the film is placed in properly, one-half frame will extend beyond
the end of the blade. Hold firm flush against the guide with your left
hand and close the blades with your right hand, locking them with the
clamp (Fig. 9).
When the film is placed in properly, one-half frame will extend beyond
the end of the blade. Hold firm flush against the guide with your left
hand and close the blades with your right hand, locking them with the
clamp (Fig. 9).
![]()
